Building a Chat App with ASP.NET Core, SignalR, React, and Redux
A few weeks back I set out to create a Chat App using ASP.NET Core SignalR. It all started when I worked through Roland Guijt’s Getting Started with ASP.NET Core SignalR on Pluralsight. The course was brief, but it made it evident that SignalR would be a perfect technology for building a chat room type app. Guijt demonstrated the power of SignalR through building a coffee ordering system that automatically notified customers of the process of making their drink. That app was great, but it was time for more information from the source, so I headed to Microsoft’s official docs. SignalR is so well suited for a chat app that Microsoft’s official “Getting Started” tutorial for the technology is to build a simple messaging system. With that sign of assurance, I decided to build out a simple chat app with SignalR.
After deciding to build the chat app, it was time to layout a rough design. So I got out the iPad, opened up autodesk SketchBook, and drew up a basic chat room interface. The end result was the image you see below. It’s not perfect, but it conveys exactly what I wanted out of the app.
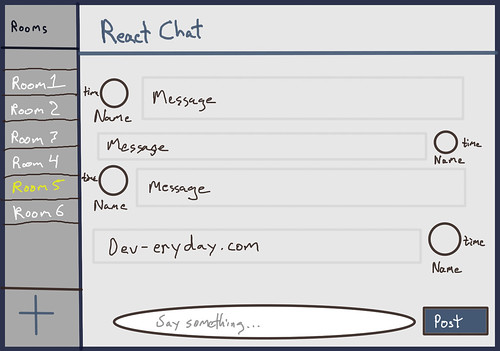
Right around the time that image was made, I decided that I would use React to make the frontend. Hence the name, “React Chat” featured prominently in the upper body of the image. So it was settled, I would be marrying two of my favorite technologies to come about in the last few years, .NET Core and React. While I was diving back in to React, it felt like a good time to use Redux again. Therefore, Redux is used for state management on the frontend.
I hope that little narrative helps set the stage. What follows will give some light detail on how I built a chat application using ASP.NET Core, SignalR, React, and Redux. The application is pretty basic, but it combines a lot cool technologies. The same techniques used to build this chat app can be used to create some truly novel systems. Bringing these technologies together to create a cohesive system may seem like a challenge before you get started, I know it did for me initially, but it’s suprisingly straightforward and fun once you get into it.
Backend
Before we go any further, this won’t be an in depth, line-by-line walk through. I’m going to give a high-level descriptions of the major steps that were taken to produce the application. This instruction should be enough to dig further into the source or potentially serve as hint on where to go next. If you want a great tutorial that is brief but definitely more thorough, check out The Little ASP.NET Core Book by Nate Barbettini. It’s the perfect primer for ASP.NET Core apps and it was the primary resource used in building out the backend. It doesn’t cover SignalR, but the Microsoft documentation for it is very good.
High Level Backend Steps
- Create ASP.NET Core Web Project
- Make Message and ChatRoom Models
- Setup DBContext and SQLite
- Build Out Dependency Injection Services
- Integrate SignalR Hubs
Before doing anything, ensure that you have .NET Core 2.1 or above installed. There are links to download the 2.1 SDK here. The SDK needs to be installed in order to be able to build the backend API. With the installation out of the way, now you can create a project. If you have Visual Studio installed, go ahead and use the File -> New Solution menu wizard to create a new ASP.NET Core API project using .NET Core 2.1. You can also create the project via the command line by issuing dotnet new webapp -o ChatAppWithSignalR in your terminal.
The models for our ChatRoom and Message classes are basic POCOs. The code for each model is listed below to provide the properties we are storing for each record. These classes are added to the Models class following the standard MVC convention.
ChatRoom.cs
using System;
using System.ComponentModel.DataAnnotations;

namespace ChatAppWithSignalR.Models
{
    public class ChatRoom
    {
        public Guid Id { get; set; }
        [Required]
        public string Name { get; set; }
    }
}
Message.cs
using System;
using System.ComponentModel.DataAnnotations;

namespace ChatAppWithSignalR.Models
{
    public class Message
    {
        public Guid Id { get; set; }
        public Guid RoomId { get; set; }
        [Required]
        public string Contents { get; set; }
        [Required]
        public string UserName { get; set; }
        public DateTimeOffset PostedAt { get; set; }
    }
}
With the basic models we’ll be working with defined, we can start building out the infrastructure that we’ll use to save to and read from a data store. Since it works on all platforms, I chose to use SQLite as the data store for the app. SQLite isn’t the database engine I’d choose for a mission critical, centralized chap app, but it’s perfect for our needs here. It gets us up and running quickly, has a small footprint, and the data store can be deployed directly as a file with the rest of the application.
In order to get the database setup, we’ll need to ad the Microsoft.EntityFrameworkCore.SqlLite package from the Nuget Package Manager Console or the package manager menu. To add the package from the console, issue the following command: Install-Package Microsoft.EntityFrameworkCore.Sqlite.
After adding the SQLite dependency, we can create ApplicationDbContext which EntityFramework will use to build our tables based off of the ChatRoom and Message classes. The ApplicationDbContext derives from the EntityFrameworkCore.DbContext class which provides the functionality needed to generate our EF migrations. The DbSet<> properties, ChatRooms and Messages, let EF know that we want it to create two tables, one named ChatRooms and another called Messages.
With the package added and our ApplicationDbContext class created, be sure to add your connection string to appsettings.json and add the DbContext to Startup.cs. This will register our database connection with our app on startup.
appsettings.json
...
"ConnectionStrings": {
    "DefaultConnection": "DataSource=app.db"
},
  ...
Startup.cs
...
services.AddDbContext<ApplicationDbContext>(options => options.UseSqlite(
    Configuration.GetConnectionString("DefaultConnection")));
...
Now we can use EF to generate the tables with the following command: dotnet ef migrations add DbSetup. EntityFramework has now created the tables for us in app.db. We can now build out the dependency injection services that actually interact with the database.
The Services folder contains the interfaces that define the database interaction functionality, IChatRoomService.cs and IMessageService, and the classes that implement them, ChatRoomService.cs and MessageService. The classes define async methods for getting and adding items to the respective tables. The constructors for both the ChatRoomService and MessageService classes accept an ApplicationDbContext object to inject the dependency via the constructor.
The IChatRoomService and IMessageService are used within the ChatRoomController and MessageController. These controllers provide GET and POST REST methods that can be called from the front end.
Be sure to register the services in Startup.cs. Adding the services here will provide the Microsoft.Extensions.DependencyInjection the ability to instantiate an IChatRoomService or IMessageService when they are needed. The AddScoped ensures that the Service object is created only for the lifetime of a single request. Check out Microsoft’s documentation on dependency injection here.
Startup.cs
...
services.AddScoped<IChatRoomService, ChatRoomService>();
services.AddScoped<IMessageService, MessageService>();
...
Now we have the ability to read from and write to the database. We’re almost done with the back end. We just need to add the real time functionality. For that, we’ll create a class called ChatHub. The ChatHub has two methods that it relies on for the application’s real time needs: SendMessage and AddChatRoom.
ChatHub.cs
...
        public async Task SendMessage(Guid roomId, string user, string message)
        {
            Message m = new Message()
            {
                RoomId = roomId,
                Contents = message,
                UserName = user
            };

            await _messageService.AddMessageToRoomAsync(roomId, m);
            await Clients.All.SendAsync("ReceiveMessage", user, message, roomId, m.Id, m.PostedAt);
        }

        public async Task AddChatRoom(string roomName)
        {
            ChatRoom chatRoom = new ChatRoom()
            {
                Name = roomName
            };

            await _chatRoomService.AddChatRoomAsync(chatRoom);
            await Clients.All.SendAsync("NewRoom", roomName, chatRoom.Id);
        }
...
These methods do exactly what their names imply. SendMessage will take a message generated on the front end, create a new Message object, use the IMessageService to write it the Messages table, and send a “ReceiveMessage” event to all connected users. The AddChatRoom method will accept the details for a ChatRoom, create a new ChatRoom object, add the new ChatRoom to the ChatRooms table, and broadcast a “NewRoom” event to the connected users.
That’s the basics of how the backend works. There’s a lot of details, and probably a few have been omitted, but there’s nothing too difficult here. The hardest part is probably configuring the pipeline.
Frontend
The frontend side of the application is driven by three technologies: React, Redux, and CSS. Building out the frontend was my favorite part of the development experience. It was a lot of fun to create the components and then tie all of the parts of the solution together. Being able to write a message on one PC and then show up automatically on another while connected and through a web service call if navigating there after the fact was a cool moment.
High Level Frontend Steps
- Create the Frontend App
- Setup Basic Component Layout
- Implement Components
- Tie Up Redux, the API, and Components
- Integrate SignalR into Essential Components
Now it’s time to create the app. Create a new folder in your repository, I called mine “ReactFrontend”. Using your terminal, navigate to the newly created folder and issue create-react-app react-chat. This command will bootstrap a React project with some sensible defaults and save us a lot of time. If you don’t have create-react-app installed, be sure to install it using the npm install -g create-react-app command. Setting up the project will take a little while.
After creating the project, let’s add the dependencies upfront. Since we know exactly what packages we’ll need, it makes sense to get them all in right away. Below is the list of packages we’ll need. Use yarn or npm to get them installed.
@aspnet/signalr - This is the package that has the SignalR frontend functionality.
redux - The state management solution used for the project. Redux allows us to store, access, update state.
react-redux - React-redux is the library that provides React with the means to use Redux.
redux-logger - A redux middleware. This package is really only needed for development, it allows us to log Redux events to the console within our web browser to verify that our Redux code is behaving as expected.
redux-thunk - Another Redux middleware. redux-thunk gives us the ability to perform an asynchronus dispatch.
tslib - This package contains some TypeScript helpers. I think this is a dependency of the @aspnet/signalr package. Without adding tslib, I was getting a “Module not found: Can’t resolve ‘tslib’ in ‘…@aspnet\signalr\dist\esm’” error without this package. See this issue that I used to find the solution.
With all the packages out of the way, it’s time to get the layout in place. The styles used for the app were largely reproduced from Building a Chat App with React.js and Chatkit. I saw the course mentioned on HackerNoon and it allowed me to quickly move over styling the app. All styles can be found in App.css. The layout takes advantage of CSS Grid. CSS Grid is a great addition to CSS and makes responsive layouts a lot easier. The key setup of our grid can be seen in the following code. We have six columns each of size 1fr and six rows, the top one is 30px tall, the bottom one is 60px tall, and the middle four are a quarter of the remaining space each.
.App {
  display: grid;
  height: 100%;
  grid-template-columns: repeat(6, 1fr);
  grid-template-rows: 30px repeat(4, 1fr) 60px;
  grid-template-areas:
    "t m m m m m"
    "r m m m m m"
    "r m m m m m"
    "r m m m m m"
    "r m m m m m"
    "n f f f f f"
}
The main components for the app are listed below with a brief description. Feel free to dive into the code for more details. Each of the components are fairly basic. The Redux setup is fairly basic too. The roomActions.js and messageActions.js take advantage of redux-thunk to get data from the REST APIs. I think the most interesting thing on the front end is the SignalR integration. In the App component, a HubConnectionBuilder object is setup in the constructor. This connects the App component to the SignalR Hub. The SignalR connection is then passed as a prop to the components that can use it to update or call the SignalR methods. Components that add messages or rooms invoke the SignalR actions. Components that display the data sent by SignalR wire up the proper actions to handle the newly received items.
App - The parent component for the application. It setups up the SignalR HubConnectionBuilder object that is used in child components.
AddChatRoomForm - A basic form for adding a new ChatRoom.
AddMessageForm - A basic form for adding a new Message to a ChatRoom.
ChatRoom - A stateless functional component that can be used to display room details.
ChatRoomList - The component responsible for displaying the available ChatRooms. It is responsible for handling the rooms added via SignalR.
Message - A stateless function component that is used to display a specific message.
MessageList - A container component that maps over all messages for a given room and displays them. The MessageList component is responsible for receiving messages from SignalR.
NoRoomSelected - This is a stateless function component that is displayed until a user selects a ChatRoom.
Title - A stateless functional component that displays the title of the app.
UserNameForm - Component used to allow the users to set their name before chatting.
Deployment
The site is deployed to Azure. With the front end complete, uses the build job defined in package.json to build out a production ready index.html. From your console issue npm run build and the code will be built. Copy the index.html file to the wwwroot folder of the Visual Studio project and add the generated css and js to their respective folders int he static folder.
In order to host the index.html file, Startup.cs needs a line within the Configure method to allow ASP.NET Core to host static files. Make sure app.UseStaticFiles(); is present.
There are several ways to actually deploy the project from here, but the easiest way is to create a publish profile either in Azure or directly through Visual Studio. You can create everything directly within Visual Studio by right-clicking the project and clicking the “Publish…” option. Microsoft makes it pretty simple to get your site online just by answering the questions within the publish wizard. After successfully answering all of the questions, a new tab in your browser will load up the deployed version of the site. Congratulations, we did it!
Notable Links
If you’ve read this far, thank you! You made it through the bulk of the work. Now for some annotated links. Many of these are included in the body of the article but are included here for further details. Each of these pages/sites played a role in the app.
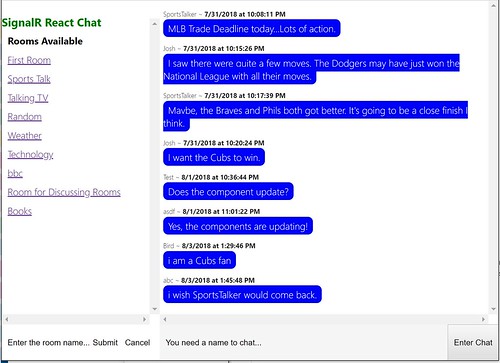
SignalR React Chat - This is the live version of the site.
NETCorePlayground - The repo that houses the app. My intention is to add more small, open-source ASP.NET Core apps here and use the code for write ups like this one.
SignalR React Chat Source - Folder from the NETCorePlayground repo containing the source code for the app. This link saves a click from the link directly above.
The Little ASP.NET Core Book - A great introduction to ASP.NET Core by Nate Barbettini. The book walks readers through building out a Todo app using ASP.NET Core.
Building a Chat App with React.js and Chatkit - An interactive tutorial on Scrimba by Per Harald Borgen. The styling content from this course was used to build my app. I didn’t watch the videos, but made heavy use of the source code in creating the app. Using the course’s CSS, made it easy to setup the CSS Grid for the chat app.
Create a Web API with ASP.NET Core and Visual Studio- This Microsoft’s introduction tutorial for building out a web API using ASP.NET Core.
React - The official documentation for React. It’s very good.
Redux - The official documentation for Redux. Redux is something I always find myself going back to the documentation on.
What’s Next
I don’t think I’ll be spending much more time with this chat app, but there are a number of features that could be added to make it a far better application. I may add a few of them for the exercise of adding them or for the chance to write a tutorial for this site. Sometimes it just fun to add features to a little side project. Here are some things I thought up that would make nice additions to the app.
Flag Rooms with Unread Messages - It’d be nice to know when new messages have been posted to a room while you’re on the site.
Show SignalR Connection Status - Currently, if the SignalR connection drops the user will only know by checking the browser’s JavaScript console. It’s not fun to be expecting new messages and nothing happens because the connection has been lost.
Automatically Attempt to Connect When SignalR Connection is Lost - When a connection is lost, the app should attempt to reconnect the user to the SignalR hub. This should happen every minute or so after the connection is lost.
Private Chat Rooms Reachable by Private URL - I would use React Router to develop this. The room would only be visible to people with the URL. It would be really cool if the room self-destructed once all participants have left. The room and all messages sent would be wiped from the record.
Multimedia Message Support - Popular social media and chap apps embed multimedia messages. The chat would be a lot nice if it did something like that.
Stream Old Messages as Needed on Loading a Room - Right now, when users load a room the front end will load all messages for that room. If the site were to get popular, this would be impossible. Loading 30 or so at a time based on current scroll position may be a better way.
Live Counts of Users by Room - From a usability standpoint it would be nice to see if there are other users online and what rooms they’re in. It’s easy to be talking to a void with the current setup.
User Accounts - The app doesn’t have accounts currently. If there were user accounts, users would have to enter a name each time and message statistics could be kept.
Site Admin - Some messages and rooms might need to be deleted someday. Admin functionality would provide the ability to keep the site operating well.
Testing - I added a .NET project for testing and setup everything I’d need to test the React app. The thing I didn’t do was actually write robust unit tests. This would probably be the best thing that could be added to the project. From there, tests could be written for each additional feature.
What are some features you’d add app? Feel free to fork the repo and post your code online if you do. Note that the ChatApp is in the ChatApp Folder within the NETCorePlayground repo. I won’t hesitate to merge the code into the main branch if it fits in with the application.
Final Words
So, that’s my chat app built with ASP.NET Core, SignalR, React, and Redux. I hope you enjoyed and possibly even learned something from all of that. It’s not really a direct tutorial, but it shines a light on how the app was built. If there were demand for it, a more in-depth post or even a short book could be written covering the concepts here. Another possibility would be a video tutorial for building out the app. I don’t think the demand is there right now but let me know if it is.
Before you leave, I hope that this post and the Chat App push you to build out a simple side project like this. It’s amazing how much functionality we can put together with a little bit of work. It was a lot of fun to build up that little app and it didn’t take much time at all. In fact, it probably took me longer to write this post than it did to write the code for the app. My personal takeaway from this project is to spend more time building little stuff like this. It’s a great way to learn and you get to mash up all the cool technologies you want to work with. Get to building!